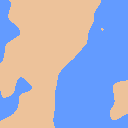
I love the look of this pixel art seashore by Daniel Linssen.
a day at the beach#screenshotsaturday pic.twitter.com/vELbdkrpeL
— Daniel Linssen (@Managore) August 20, 2016
It’s an amazing piece of art, and it’s also technically intriguing. After browsing Daniel’s website and seeing his procedurally generated Planetarium; I realised that this game was probably also procedurally generated; and that meant that the seashore was probably modelled using a close analog to the physical world – a height map.
While I can never hope to replicate the creativity here, I thought it might be fun to have a crack at replicating the mechanics of it. The first thing to do is grab Jonas Wagner’s Simplex Noise library to create some terrain. The techniques used are described in this excellent tutorial, and we end up with something like this. (Note that I’ve fixed the seed for the generation; so we always get the same terrain)
See the Pen Beachy Island – Terrain by Steve (@sjmelia) on CodePen.
Now we have our terrain, let’s colour it in. I hope Daniel will forgive me if we copy his beautiful colour scheme. To describe the difference between the sea and the land – remembering that the height map consists of numbers normalised to between zero and one – we can set a threshold at 0.75 and see what it looks like!
render: function() {
  for (var x = 0; x < this.width; x++) {
    for (var y = 0; y < this.height; y++) {
      var offset = this.width * y + x;
      var h = this.heightMap[offset];
      var colour = h > 0.75 ?
        this.colours.land : this.colours.sea;
      this.setPixel(offset, colour);
    }
  }
  this.ctx.putImageData(this.imgdata, 0, 0);
}

Looking good so far; but Daniel’s image has a couple more shades which I like to call:
tone– the lighter blue colour of the sea as it approaches the shallow waterwash– the white foamy spray as it hits the shoresand– the drying sand as the sea leaves the beach
So let’s add these, just using the heightmap to determine what colour each pixel should be. We’ll keep the colours in a map.
var offset = this.width * y + x;
var h = this.heightMap[offset];
var colour = this.colours.land.colour;

if (h < this.colours.sand.height) {
  colour = this.colours.sand.colour;
}
if (h < this.colours.wash.height) {
  colour = this.colours.wash.colour;
}
if (h < this.colours.tone.height) {
  colour = this.colours.tone.colour;
}
if (h < this.colours.sea.height) {
  colour = this.colours.sea.colour;
}

this.setPixel(offset, colour);
See the Pen Beachy Island – Colouring In by Steve (@sjmelia) on CodePen.
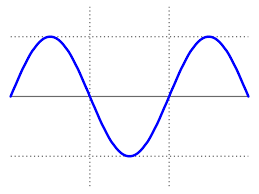
Great! Now we’re getting somewhere. Now to animate it. We’ll need to change the threshold values for the various colours, modelling the ebb and flow of the sea. I’m going to go with a simple sine wave; which will of course periodically increase and decrease like this:

We need to put the render function in an animation loop; and each iteration through the loop we’ll increment this.frame and pass it to the Math.sin function to get our current sealevel:
var sealevel = Math.sin(this.tide.frequency * this.frame) * this.tide.amplitude + this.tide.centre;
Then all we need to do is update our colouring in function to take account of the sea level factor:
var h = this.heightMap[offset];

var colour = this.colours.land.colour;

if (h < this.colours.sand.height + sealevel) {
  colour = this.colours.sand.colour;
}
if (h < this.colours.wash.height + sealevel) {
  colour = this.colours.wash.colour;
}
Let’s just make sure the drying sand (the colours.sand) only appears when the water is receding – we’ll have it lag slightly by getting the value of the sine wave a few frames behind. Our whole render function looks like this:
render: function() {
  var sealevel = Math.sin(this.tide.frequency * this.frame) * this.tide.amplitude + this.tide.centre;
  var drylevel = Math.sin(this.tide.frequency * (this.frame - 200)) * this.tide.amplitude + this.tide.centre;

  for (var x = 0; x < this.width; x++) {
    for (var y = 0; y < this.height; y++) {
      var offset = this.width * y + x;
      var h = this.heightMap[offset];

      var colour = this.colours.land.colour;

      if (h < this.colours.sand.height + drylevel) {
        colour = this.colours.sand.colour;
      }
      if (h < this.colours.wash.height + sealevel) {
        colour = this.colours.wash.colour;
      }
      if (h < this.colours.tone.height + sealevel) {
        colour = this.colours.tone.colour;
      }
      if (h < this.colours.sea.height + sealevel) {
        colour = this.colours.sea.colour;
      }

      this.setPixel(offset, colour);
    }
  }
}
I’ve also adjusted the heightmap to sample every fourth pixel; to get a kind of pixel art effect.
See the Pen Beachy Island – Animating by Steve (@sjmelia) on CodePen.
That’s where I’m going to leave it, although there’s a couple of pieces missing:
- The terrain is not quite right – Daniel’s height map generation is probably a bit more sophisticated; or it might be better to use a hand-made heightmap.
- I think it looks a bit too much like the animation is “breathing”; which is due to the sine wave function.
- This is slightly inefficient; because we’re calculating the sine wave twice; and could possibly cache that calculation, and we’re also overpainting quite a few pixels.
There are plenty of parameters to modify – the inputs into the Math.sin function, and the various threshold values. Of course, that’s where the the artistry and sense of aesthetic comes in! Not to mention turning a quick demo effect like this into a full blown game. Check out the rest of Daniel’s work.