Bricking a Sky SR101 Router

I’ve had an old Sky SR101 router lying around for a while now, waiting for embedded device hacking practice.

I began by removing the case, in particular noting a secret screw underneath one of the rubber feet, and then prizing out the clips as described in a skyuser post. After removing the case, two sets of 10 pins are immediately obvious – you can see them in this image – note that mine did not have the header attached; I had to solder one on.

To identify which was which, I referenced a previous disection of an SR102, on the OpenWrt website. I then used a multimeter to try and figure out ground, v+, transmit and receive pins as described here. These looked good so I soldered on a header and connected up my FTDI cable after googling the cable out.

Unfortunately I couldn’t remember how to use the FTDI cable! A quick lsusb showed that linux had recognised it and so screen /dev/ttyUSB0 115200 got me connected. However, there was no input. At this point I thought my soldering ability had let me down… but a chance disconnection of the ground cable resulted in some readable text on the console; and a bit of investigation revealed that i’d mistaken v+ for gnd; and swapping the pins gave me perfect output.

Time to login – but there was no response to any keypresses. A bit of googling told me that this was probably down to screen trying to use hardware flow control; so I quit the session and restarted it again with screen -fn /dev/ttyUSB0 115200 – voila, pressing enter presented me with a login prompt.

Using the username and password shown on the OpenWRT page for the SR101 (admin, sky) I was able to login!

At this point I took a step back and used cat to save a log of the system boot; revealing a few useful tidbits about the device:

Chip ID: BCM6362B0, MIPS: 400MHz, DDR: 333MHz, Bus: 166MHz
Total Memory: 134217728 bytes (128MB)
Boot Address: 0xb8000000

After starting busybox’s sh and having a little browse the novelty wore off and to sustain interest I decided I needed to flash the device. After toying with building my own OpenWRT hardware I decided to take a punt on flashing it with the offered SR102 firmware. After downloading the firmware from the OpenWRT page I started python -m SimpleHTTPServer 8080 and followed the OpenWRT guide. The firmware seemed to flash, I rebooted the machine, and.. BRICKED!

Oh well! Experimentation over! Maybe next I can have a look at using the JTAG pins to see what I can recover…

Bridged network adapter with remote luks decrypt

So… imagine you have a KVM host, set up with a public bridge on eth0 as described on the Debian wiki. The configuration seems to match exactly; yet when the bridge starts, connectivity is lost on the host. So although the guest VM is able to ping out to say; Google, the host has no outbound connection.

After a complete red herring involving this host being connected to a TL-WR702N wireless bridge; (does this mean I need to rewrite the MAC address of my VM?) and a digression into ebtables – I finally struck gold with the output of ip route which showed me that both the bridge (in my case kbeth0) and my physical adapter (etho) had the same IP.

That can’t be right! Makes you think about how you were so intent on this machine having LUKS encryption; but wanted to be able to shove it in a cupboard and decrypt remotely through ssh. And so when the machine boots off the initrd I start up a dropbear ssh server; assigning a static IP via the grub command line; and how perhaps that assignment persists after the disk has been decrypted and kbeth0 comes up.

Turns out; adding an ip addr flush dev eth0 to the end of /etc/rc.local (just before the exit 0) means that kbeth0 is able to come up with the right ip address; having taken it off eth0 – and all is right with the world once again. And – no need to fiddle about with ebtables.

I can’t say i’m entirely sure of this hypothesis; but it seems to work – and now I can decrypt on boot remotely; while still bridging my network adapter to run virtual machines in KVM.

Intel Dual Band Wireless-AC 3165 with Debian Jessie

Having bought a new laptop with an Intel Dual Band Wireless-AC 3165 adapter I had a few wifi troubles. It turned out that my kernel was a little too old for the driver; and I needed to update to at least 4.2 by adding jessie-backports to my sources.list; upgrading the kernel, and doing an apt-get install iwlwifi-firmware.

One further step was required – it turns out the iwlwifi driver loads firmware for the wireless adapter; and you need specific versions of the firmware. This was resolved by downloading the firmware for my adapter; and copying it into /lib/firmware.

So far so good! And then… a kernel upgrade. My wireless disappeared! It took a while but I finally figured it out by delving into the details of the firmware versioning. The iwlwifi driver defines an API; and only loads firmware for a span of versions. The version is listed in the filename; e.g. iwlwifi-7265D-14.ucode is a firmware supporting version 14 of the API. When the module loads it will try to load firmware versions in sequence – you can see this by typing sudo dmesg | grep iwlwifi which will give you an output like this:

[    2.164582] iwlwifi 0000:02:00.0: firmware: failed to load iwlwifi-7265D-23.ucode (-2)
[    2.164587] iwlwifi 0000:02:00.0: Direct firmware load for iwlwifi-7265D-23.ucode failed with error -2
[    2.164603] iwlwifi 0000:02:00.0: firmware: failed to load iwlwifi-7265D-22.ucode (-2)
[    2.164608] iwlwifi 0000:02:00.0: Direct firmware load for iwlwifi-7265D-22.ucode failed with error -2
[    2.188461] iwlwifi 0000:02:00.0: firmware: direct-loading firmware iwlwifi-7265D-21.ucode
[    2.188898] iwlwifi 0000:02:00.0: loaded firmware version 21.373438.0 op_mode iwlmvm

Here you can see the driver failing to load versions 23 and 22 – the files for which don’t exist – before succeeding with 21.

Unfortunately the latest version listed on the Intel website above is 14; and you can’t just rename these files – they have a header with the version which is checked. Just renaming the file only yielded an error message telling me Driver unable to support your firmware API. Driver supports 21, firmware is 14.

At this point I was starting to think the latest version was just too far ahead of the kernel; and was on the verge of trying to patch the firmware binary! Fortunately I did a bit more googling first, and managed to find an Intel support page that reveals later versions of the firmware can be downloaded directly from the linux-firmware repo. So by downloading version 21; and dropping it into /lib/firmware I was finally able to get wifi working with 4.9!

MQTT Quick start!

I’ve got a project in mind and I want to put a bit of pub/sub in it. It’s an “Internet of Things” (IOT) project and the idea is that my devices will be pretty simple – i’ll just publish some values from a sensor to my broker; and do the heavy lifting of analysing and acting on the readings using a “real” computer or server. The devices will be simple and low-powered so a lightweight protocol like MQTT seems like a good choice.

It looks like the premier open source broker for MQTT is Mosquitto; so let’s use that to get a broker up and running; publish some messages to it; and have a subscriber log those messages out to the console. This, by the way; is all going to be on Debian Jessie.

I don’t like to “pollute” my laptop with every hobby project that momentarily grabs my attention; so first let’s get docker installed and then start up the toke/mosquitto container.

sudo apt-get install docker.io
sudo docker run -ti -p 1883:1883 -p 9001:9001 toke/mosquitto

Next we’ll run up a couple of python scripts in a virtualenv: (I assume you’ve already done a apt-get virtualenv to install virtualenv and Python on your system) These will, respectively; publish messages to the broker (under a test topic) and subscribe to that topic.

mkdir mqtt-test
cd mqtt-test
virtualenv env
source env/bin/activate
pip install paho-mqtt

publisher.py

#!/usr/bin/env python
import time
import paho.mqtt.client as mqtt

def on_connect(client, userdata, flags, rc):
    print("Connected with result code " + str(rc))

client = mqtt.Client()
client.on_connect = on_connect
print("I'm alive!")
client.connect("localhost", 1883, 60)

while True:
    client.publish("test", "This is a test transmission!")
    time.sleep(1)

subscriber.py

#!/usr/bin/env python
import paho.mqtt.client as mqtt

def on_connect(client, userdata, flags, rc):
    print("Connected with result code " + str(rc))
    client.subscribe("test")

def on_message(client, userdata, msg):
    print(msg.topic + " " + str(msg.payload))

client = mqtt.Client()
client.on_connect = on_connect
client.on_message = on_message
print("I'm alive!")
client.connect("localhost", 1883, 60)

client.loop_forever()

Don’t forget to chmod +x *.py and then you can ./publisher.py and ./subscriber.py in two separate consoles to see your dockerised MQTT broker in action. Now I just need to wait for my devices to be delivered and I can get to the interesting bit!

Electron with SQLite

See the code on Github

After some recent adventures with Phonegap (perhaps more on that later) I thought i’d give Electron a go. Any desktop app benefits from a little RDBMS magic, so I wanted to get that prerequisite sorted sharpish – but it was surprisingly difficult to get SQLite integrated into my build.

A repo from Ben Bytheway helped me get something working; but as the default name for the binding output from the native build is for Node; it took quite a lot of fettling to get this working with Electron on Linux. Further browsing drew a blank; but while trying to understand how bundling was going to work I stumbled across Jakub Szwacz’s excellent electron-boilerplate; which uses electron-builder for packaging and includes an explanation of how this can be used to drive the compilation of native modules.

Electron-builder makes it super easy; it’s simply a matter of npm install --save sqlite3 to grab the module; and npm run postinstall to have electron-builder compile any native libraries with the correct names.

So here’s my own boilerplate sample – electron-boilerplate-sqlite – just a no frills example of using SQLite in an Electron app.

Pixel art seashore

I love the look of this pixel art seashore by Daniel Linssen.

It’s an amazing piece of art, and it’s also technically intriguing. After browsing Daniel’s website and seeing his procedurally generated Planetarium; I realised that this game was probably also procedurally generated; and that meant that the seashore was probably modelled using a close analog to the physical world – a height map.

While I can never hope to replicate the creativity here, I thought it might be fun to have a crack at replicating the mechanics of it. The first thing to do is grab Jonas Wagner’s Simplex Noise library to create some terrain. The techniques used are described in this excellent tutorial, and we end up with something like this. (Note that I’ve fixed the seed for the generation; so we always get the same terrain)

See the Pen Beachy Island – Terrain by Steve (@sjmelia) on CodePen.

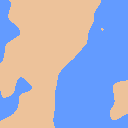
Now we have our terrain, let’s colour it in. I hope Daniel will forgive me if we copy his beautiful colour scheme. To describe the difference between the sea and the land – remembering that the height map consists of numbers normalised to between zero and one – we can set a threshold at 0.75 and see what it looks like!

render: function() {
  for (var x = 0; x < this.width; x++) {
    for (var y = 0; y < this.height; y++) { 
      var offset = this.width * y + x;
      var h = this.heightMap[offset];
      var colour = h > 0.75 ?
        this.colours.land : this.colours.sea;
      this.setPixel(offset, colour);
    }
  }
  this.ctx.putImageData(this.imgdata, 0, 0);
}

beachy-terrain-colour

Looking good so far; but Daniel’s image has a couple more shades which I like to call:

  • tone – the lighter blue colour of the sea as it approaches the shallow water
  • wash – the white foamy spray as it hits the shore
  • sand – the drying sand as the sea leaves the beach

So let’s add these, just using the heightmap to determine what colour each pixel should be. We’ll keep the colours in a map.

var offset = this.width * y + x;
var h = this.heightMap[offset];
var colour = this.colours.land.colour;
        
if (h < this.colours.sand.height) {
  colour = this.colours.sand.colour;
}
if (h < this.colours.wash.height) {
  colour = this.colours.wash.colour;
}
if (h < this.colours.tone.height) {
  colour = this.colours.tone.colour;
}
if (h < this.colours.sea.height) {
  colour = this.colours.sea.colour;
}

this.setPixel(offset, colour);

See the Pen Beachy Island – Colouring In by Steve (@sjmelia) on CodePen.

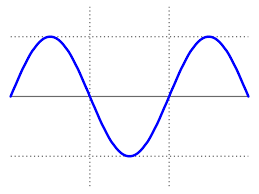
Great! Now we’re getting somewhere. Now to animate it. We’ll need to change the threshold values for the various colours, modelling the ebb and flow of the sea. I’m going to go with a simple sine wave; which will of course periodically increase and decrease like this:

sine-wave

We need to put the render function in an animation loop; and each iteration through the loop we’ll increment this.frame and pass it to the Math.sin function to get our current sealevel:

var sealevel = Math.sin(this.tide.frequency * this.frame) * this.tide.amplitude + this.tide.centre;

Then all we need to do is update our colouring in function to take account of the sea level factor:

var h = this.heightMap[offset];
                
var colour = this.colours.land.colour;
        
if (h < this.colours.sand.height + sealevel) {
  colour = this.colours.sand.colour;
}
if (h < this.colours.wash.height + sealevel) {
  colour = this.colours.wash.colour;
}

Let’s just make sure the drying sand (the colours.sand) only appears when the water is receding – we’ll have it lag slightly by getting the value of the sine wave a few frames behind. Our whole render function looks like this:

render: function() {
  var sealevel = Math.sin(this.tide.frequency * this.frame) * this.tide.amplitude + this.tide.centre;
  var drylevel = Math.sin(this.tide.frequency * (this.frame - 200)) * this.tide.amplitude + this.tide.centre;
      
  for (var x = 0; x < this.width; x++) {
    for (var y = 0; y < this.height; y++) {
      var offset = this.width * y + x;
      var h = this.heightMap[offset];
                
      var colour = this.colours.land.colour;
        
      if (h < this.colours.sand.height + drylevel) {
        colour = this.colours.sand.colour;
      }
      if (h < this.colours.wash.height + sealevel) {
        colour = this.colours.wash.colour;
      }
      if (h < this.colours.tone.height + sealevel) {
        colour = this.colours.tone.colour;
      }
      if (h < this.colours.sea.height + sealevel) {
        colour = this.colours.sea.colour;
      }

      this.setPixel(offset, colour);
    }
  }
}

I’ve also adjusted the heightmap to sample every fourth pixel; to get a kind of pixel art effect.

See the Pen Beachy Island – Animating by Steve (@sjmelia) on CodePen.

That’s where I’m going to leave it, although there’s a couple of pieces missing:

  • The terrain is not quite right – Daniel’s height map generation is probably a bit more sophisticated; or it might be better to use a hand-made heightmap.
  • I think it looks a bit too much like the animation is “breathing”; which is due to the sine wave function.
  • This is slightly inefficient; because we’re calculating the sine wave twice; and could possibly cache that calculation, and we’re also overpainting quite a few pixels.

There are plenty of parameters to modify – the inputs into the Math.sin function, and the various threshold values. Of course, that’s where the the artistry and sense of aesthetic comes in! Not to mention turning a quick demo effect like this into a full blown game. Check out the rest of Daniel’s work.

Updating an Android app and deploying to the Amazon app store

The amazingly-named Super Tally Counter is one of the first apps I deployed to the Play store. It’s hardly a cutting edge bit of dev – and there’s plenty of other counting apps – but it has managed to pick up about four thousand downloads so not too shabby. Personally I think it is down to the great design and marketing πŸ˜‰

I thought it needed a bit of love so I cleaned out the repo; deleted the build.xml then ran android list targets to get a target and android update project -p . --target [targetid] to regenerate these two files for the Ant build and update to the latest version of the SDK. This is a super simple app but I was still surprised at just how easy it was to drag something from 6 years ago into the light – and switching to Android’s Light theme and updating the icons with a bit of help from the Android Asset Studio and Google’s material design icon library gave it a bit of a refresh.

Having recently bought an Amazon Fire tablet; I thought i’d also get it deployed into the Amazon App Store. This too was easier than I thought. Amazon offers a compatibility testing tool which pretty quickly showed that the App would probably work fine; despite including an ancient version of the AdMob library. (I expected this to be a bit of a sticking point)

I did need to generate a few more assets to get the thing accepted into the store, and this was probably the most awkward bit! Filling in the rest of the listing was easy; and it’s now available in the Amazon app store too. Regrettably I think i’m a bit late to this particular niche and it probably won’t be picking up 4,000 downloads there!

I think the next move would be to upgrade this app to Gradle; which seems to the build tool used with Android Studio. I think i’ll see if downloads pick up with the refresh and if so maybe look at updating the build and adding a few new features… maybe I should call the next version “Advanced Super Tally Counter”…

Regexbot – Slack chat bot and Jira integration

See the code on Github

Slack is a great tool with loads of plugins and integrations. There’s already an integration with Jira that allows you to create and update issues from Slack; but I wanted a bot that would listen out for Jira case numbers, and produce a link to the case along with the case summary/title. The goal was something like this:

regexbot

There are a few solutions for building bots, in particular Github’s hubot is a sensible choice – not only does it come with loads of stuff built in; but also abstracts the connection to the chat system. This means that one piece of code can connect to Slack and many other chat systems.

However; being in this for the lulz I rejected the sensible option and went for the slack-client npm package; while browsing around the Slack API docs to try and figure out what to call. In particular we’re interested in the real time messaging (RTM) api. slack-client makes it remarkably easy to create a self-hosted bot; or “bot user integration” in Slack parlance. The steps are roughly:

  1. Create a bot user to get a secret token that can be used to authenticate to Slack
  2. Open a connection to the RTM api
  3. Listen for when someone posts a message; and write a function to reply back

However, it still seemed worth abstracting away the capture and detection of Jira case numbers. Thus Regexbot was born – it will sit on any Slack channel its invited too; and listen out for messages matching a regex. When it finds one it’ll reply with either a bit of text or call the specified callback. This is just a tiny improvement over the existing slackbot functionality; but it makes quite a difference as replies can now substitute in bits of the original message using the regex matches.

Having sorted out the link – just substituting any matches of /[A-Z]+-[0-9]+/g into an URL – we can now think about retrieving some info from Jira’s JSON API. In my regexbot installation i’ve got a function that just uses node’s https module to do this; but there already exists a jira npm package that would probably be a better choice.

It’s a pretty useful tool and being able to just type out a case number and get a link and description back just makes life that little bit easier. I guess I should also emit the assignee for hassling purposes…

The next step would be to package this up and deploy it as either a Slack App (a SaaS system) – although this would naturally only be able to connect to a publicly exposed Jira – or perhaps a Jira plugin. Could be interesting; and would make it so much easier to use.

Profiling PHP with XDebug and KCacheGrind

Howmanydaysin.com was an experimental “single serving site” that grew a bit.

It’s an app to tell you how many days are in a year/month, and how many days until a certain date. You can log in with Facebook and add comments against dates and so on. I’ve translated it into a few different languages which are all reasonably popular – certainly a much wider audience than this blog!

It’s written in PHP on Apache against a Postgres database, and it uses a little homemade MVC framework, just for fun. Put the facts together and it’s easy to see why i’ve been getting constant emails about server CPU usage… and with new year being a particularly busy time it had ramped up to a point where something had to be done.

Before taking action, it’s best to get as much information as you can – in this case, about how the system is behaving. Now in the past the idea of doing any kind of analysis in PHP would have filled me with foreboding; but as it turns out things have improved somewhat for PHP and you can quickly get profiling your code using a debugger called xdebug.

Installing on Debian Jessie was a breeze; first a little apt-getting:

apt-get install php5-xdebug

and then editing the config in /etc/php5/apache2/conf.d/20-xdebug.ini to turn on the profiling:

zend_extension=xdebug.so
xdebug.profiler_enable=1
xdebug.profiler_output_dir=[path to log dir]

Restart your web server and this will start churning out cachegrind.out.* files into your output directory; if you’re running a forking Apache it’ll be one per worker process. SCP these down to your local box and open them in KCacheGrind to view hot spots in your code.

Having done this on my app it was immediately apparent what the source of the problem was; can you spot it?

Screenshot from 2016-01-04 00:02:23

Well, who can miss it? Day->getWorkingDays turned out to be a horrific piece of hackery that had accidentally slipped in – working out how many working days between two dates by looping over the whole lot; and checking the week number to see if it was a weekend or not!

Particularly problematic during bot crawls through to 1066.

Thankfully, Stack Overflow made this a five minute fix with a drop in replacement that just needed a few adjustments to fit; and uses a much faster algorithm that was obvious in retrospect; counting the number of weeks and accounting for the first and last week.

Premature optimization is the root of all evil. Yet we should not pass up our opportunities in that critical 3%!