Lowering energy consumption is a great way to save money; and you can’t improve something without measuring it. An internet connected energy monitor would be great, but spending money to save money leaves a bit of a sour taste. How about dragging out that Raspberry Pi from the back of the garage; and using that to do it?
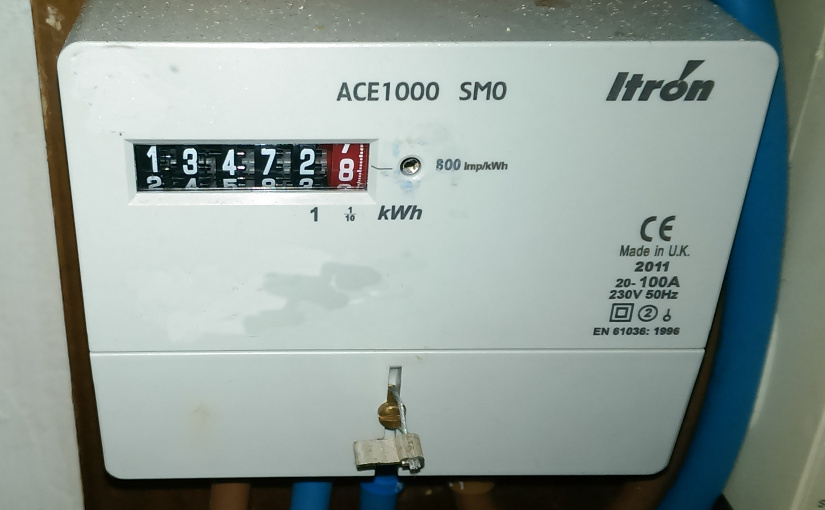
I think for some electricity meters you can wire up directly to the meter; but it’s a bit too close to 240V for my taste. Luckily many electricity meters also have a “pulse output”; a blinking light that indicates consumption – usually 1 pulse for a watt hour, (Wh) equivalent to using one watt for one hour; and 1000 pulses for a kilowatt hour, (kWh) which is about 10p worth of electricity at the moment. Perhaps my electricity meter is a bit unusual – an easy to find PDF online gives the “meter constant” as 800 pulses per kWh; so it’s best to check.
Once you know your meter constant, you can of course get various apps like this one to do it all for you; using the phone camera to watch for the flashing LED. However my wife refuses to hold the phone while i walk around the house turning all the light fittings on and off; and I couldn’t find a stand for my phone that would hold it in the right place. So i’m forced to do something more interesting.
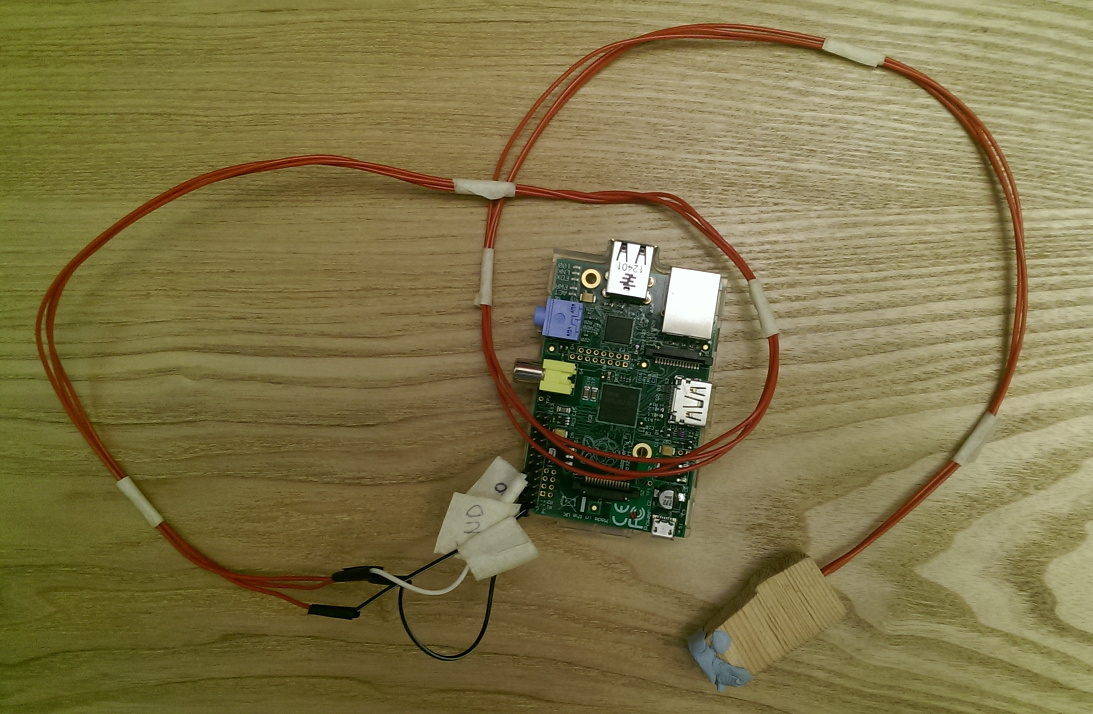
Reading the LED using a Pi is pretty easy in principle. A “light dependent resistor” (LDR) is a component whose resistance decreases as it is exposed to more light. By measuring the resistance we can detect the change in light – we can tell when the LED is on or off. Getting these components and connecting them up to the Pi was probably the most difficult part for me – but the Adafruit website has a good guide, to summarise:
- Get an LDR like this one; with a resistance range from 200KΩ to 10KΩ
- Get a 1uF capacitor like this one, rated for greater than 5V
- Use a Pi pin diagram to make sure we’re connecting one side of the LDR to the GPIO 18 pin, and one side to the 3.3V pin
- attach the negative side of the capacitor (marked with a -) to the ground pin; and the positive side to the GPIO 18 pin
- I got hold of some longish jumper wires – gives a bit of flexibility when connecting to the Pi. I cut the ends off and soldered it to the LDR and cap.

Note the pro touch of adding a little bit of electrical tape around the connection between the LDR and the cap.
Why do we need the capacitor? The Raspberry Pi’s general purpose input/output (GPIO) pins are digital – they can only be either “high” or “low” and this depends on the voltage passing through. (approx 2V is considered “high”) The LDR is analogue; so we need to use a capacitor to quantise the values. This article explains it well.
Hardware done – on to the software.
The Adafruit guide also includes a bit of Python for measuring the resistance; so that can be used as the basis for the software side. The function RCtime does all the work of reading a value off the Pi’s general purpose input/output (GPIO) pin and gives us back a nice integer value.
So we first of all need to determine whether the light is on or off; based on some threshold value – i.e. what resistance from the LDR means the light is on.
threshold = 7000
while True:
     reading = RCtime(18)
     signal = True
     if reading > threshold:
         signal = False
It took me a while to get the right threshold value – I also ended up “masking off” the LDR by putting it inside a bit of wood with a hole drilled through it, and blue tacking it to the meter! Doing this made it much easier to find the threshold.
Then, if the LED is on, and it was previously off, we can work out how long it was off for, and use that to calculate an instantaneous reading in watts of the power that is being used:
if lastSignal == False and signal == True:
    newTime = time.time()
    difference = newTime - lastTime
    power = seconds_in_an_hour / (difference * meter_constant)
    lastTime = newTime
lastSignal = signal
Finally, we can write it all out to stdout. When we run it, we can always redirect stdout so we can e.g. save the data for later analysis.
python monitor.py > power.csv
Now; it would be great to get this data up to a cloud service like Azure or maybe just plot.ly and have a graph I can obsess over day and night… but i’ll leave that for a later project.
You can find the code on Github.